Showing posts with label Triumph. Show all posts

Thursday, April 10, 2025

Rear Wheel Well Rust

One of the video blogs I watch said "the project you have to do before you get to the project you want to do". This is one of those. To finish up on my Miata suspension project I needed to fix the rust in the wheel wells. Had been putting that on the back burner when doing rust repair but now it had to be done.


Cut out the inner wheel well where there was rust between it and the doubler on the outside. There was zero primer or rust protection on the metal between the two. Luckily most of the outer doubler was in good shape but did have to cut off a bit and weld on a new section. Wire wheel and some paint on the doubler. Then weld on some new patches made from some sheet metal from a GT6 parts car. Keeping it Triumph original :-)

Some keen observers will notice the opening has been cut out larger to accommodate the Miata control arms. At this point I already had the suspension bits fitted for location but removed to fix this rust before I start welding it all together. Using the huge hole in the floor for access repairing the rust did make things a bit more comfortable.


Saturday, October 31, 2020

Rear Light Holes, Hatch Latch Support

Starting to think about priming the rear structure of the car. There are a bunch of little fixes and details that have been working on. Here are some of them:


Drilled the holes in the rear valence. Was a bit scared to drill the light holes but looks like they turned out nice. Also put in the holes for the bumper support, license plate light and license plate. Welded in nuts on the inside for the license plate to make it easier to put on and hopefully more likely to keep out water.

Welded in the hatch latch support or whatever it's called. Had that floating around for awhile and am glad to have it attached.


Repaired the lower left corner of the hatch weather seal. This had rusted away as is pretty typical. Looked like some metal munching mouse had taken a little bite out of it. But now it looks all good again.

Seam welded the fender to the lower valence pinch weld closed. This originally had a painted decorative cover over it. I'm considering not adding the cover as it looks like a water trap to me. The welded seem ground smooth looks pretty similar. Will see what it looks like with the car fully primed. I can always add the cover later.


Lots of grinding and sanding on the 100's of plug welds (over 500 just in the fenders and rockers). If I had realized how much finishing of the welds was required I'd found a way to get a good resistance spot welder. Little late now as I don't have that much left.


Thursday, October 29, 2020

Top Of B-Pillar Repair

 As mentioned before there was rust where the B-pillar meets the side/quarter light window frame. There was also a small dent in the outside of that frame. So I cut out the plate that was rusted to about half way up the frame. It became obvious why it rusted. Where the quarter light window rivets to the frame water had came in through those holes. With no opening at the bottom (thanks triumph) the dampness rusted a big hole. But it also rusted the inside pretty good and there were some pinholes near the bottom as well. Bummer.


I cut the same part from the parts car but was not optimistic that it would be a lot better. It was better but it also had some thinning metal at the bottom. I was considering using it when I noticed a crease on the window frame side from when the roof was crushed pushing it against the glass. From the disassembly I was able to see there is NO primer of paint in there. Remarkable that it wasn't worse after 50 years.

Back to my original piece i finished removing the backing plate. Quite a lot of rust but near the bottom was the only really bad stuff. Sorry no picture. Not sure where it went. Sand blasted the whole thing which showed some patching was required. Decided instead of cutting out chunks and welding in patches to put in a piece of backing material and weld through the thin spots to build them up. Figured it was faster and less likely to get everything out of sorts.

While the back was totally open I hammered out the small dent. Then noticed some other warping near the bottom on the quarter light side. Perhaps this contributed to the water getting in.

In making a new patch piece for the back I decided that instead of trying to form the crease down the center I would weld a stiffening rib on where would be the inside. This worked nicely even though the welding was a bit terrible. But it did warp the plate and I had to straighten it. After straightening I put it against the car only to see that on the side window edge the car isn't straight at all but curves as it goes down. With a little work I put that curve back in. Epoxy primed the inside the welded it on.


Friday, October 16, 2020

LH Side Welded

 After about 50+ man hours of work and 3 weeks the car looks......Well about the same. But instead of screws holding it together it is welded solid. Starting to feel like a car again instead of an art project.


It feels a bit weird to have to ask myself "what do I work on next". Been on the same part of the car for sooo long.


Sunday, October 11, 2020

RH Side Welded

 Well the RH Rear fender and rocker are welded on to the car. Spent a few evenings doing one last hammer and dolly on the patches and punching the holes. Then welded it on. All except the end cap which I'm keeping open so I can paint and maybe even seam seal later.


Sadly the car looks about the same as it did when everything is screwed together. But it is much more solid now. I've had a strap holding the lower A pillar in position for so long (without the rocker the lower A pillar is mostly just one thickness of sheet metal). It was nice to finally remove it.

It all turned out pretty good except the vertical gap between the door and rocker panel. Despite it looking good when screwed together after welding I noticed it's not as consistent as it was. It's a bit tighter a little bast the middle of the door and then back to good. Humm. I'll try the shrinking disc on it later. Perhaps it can shrink the metal back so it is better. But that can be a future project.

The one white tunnel picture is the inside of the rocker panel showing that the bottom edge has been painted (will do the top when I flip the body over). The brown spots are blasting media that must have slipped through the upper seem. Guessing from the inner sill to stiffener. That blasting media gets everywhere.


Saturday, October 10, 2020

Rocker Transition And Painting

 Before welding on the Rockers it looked like a good idea to weld on the transition piece. That way I could paint the inside and ensure it would be coated well. Then it would just have a weld seam against the A pillar similar to the rest of the rocker panel. I did not weld on the end cap. This was likely welded to the rocker before assembly to the car at the factory. I will leave it open so I can paint, or at least attempt to paint, the weld seams on the inside of the rocker. I picture moisture pooling up there and don't want any bare metal.


After that we primed the parts of the car that would be inside the Rockers and fenders. For projects where they don't remove these I don't see a lot of talk of how they get the paint in there. Or when they made the car originally. Perhaps that is a reason why they rusted so quickly? Who knows. I know I want it all painted/sealed.

The weld flanges were all taped off and the surfaces primed (still taped off in the pictures). This time we are using a white primer.


Sunday, September 20, 2020

Home Made LH B Pillar Fender Patch


This week I made and installed the b-pillar fender patch for the LH side. For the RH side I had purchased one but it required so much work with the shrinker stretcher to get the profile right that I didn't think I'd loose much by making my own. So I did. Think it turned out pretty well, Also welded the patch in.


Other things completed was fitting the LH rocker panel to the car. It fits much better at the front of the door than the RH side. Did a quick profile comparison and no they are not the same. Ugh. Where is that guy that posts that he never has had any fitment problems with replacement panels? But was happy at least one side is good. As far as inboard outboard the LH as a bit of a bulge in it. Not sure if I'll cut and weld it or no. The door is original and had a few bumps and is not straight anymore. Might be just as easy to form the door to the Rocker contour.

Also welded in the rear valence brackets that are on the Right and left edges where it welds to the top. And also welded in the RH tail light mount plate. In the next week or so I'd like to move to prepping for painting the inside parts of the fenders, rockers and structure and welding them on. Everything takes longer than expect so who knows how far I'll get.

Sunday, August 16, 2020

RH B-pillar Fender Patch Fitting

Sadly not much happened on the GT6 this week. I had done a little on earlier in the week but then Thursday I took a vacation day and was planning to pickup some parts for the the later customizing of it. But I hurt my back before the day got going (partly from too many years setting at a desk) and that ended that. Waiting for that to get better before I can work on things again. But before all that I started getting the B-pillar patch ready to weld to the fender.


In the pictures you can see I've done a bit of hammering and reshaping of the patch to fit the door and the contour of the car better. Also did a bit of this on the fender as well. I think the door gap is starting to look pretty good about right. Also cut the top of the fender patch and the fender on the seem. Seemed like a good idea (punny). The fit there is about ready to weld. The edge on the wheel arch isn't perfectly flush and needs a bit more work to fit nicely.


Friday, April 5, 2019

First Week of GT6 ownership

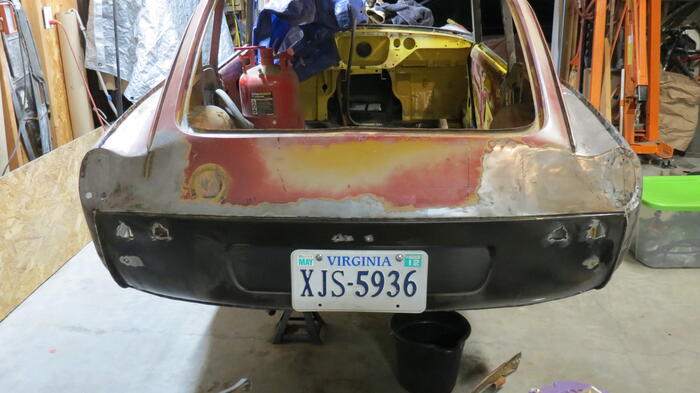
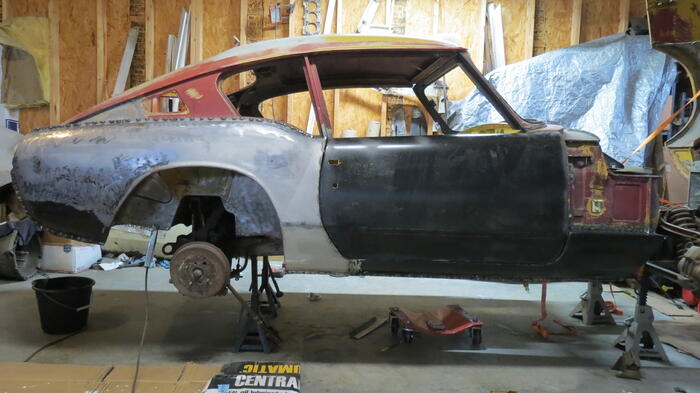
 3/30 Last Saturday I bought a GT6. It had been someone else's project for a 3 years. The car has had the interior, passenger floor and passenger sills removed. It came with new sills and floor panels. The passenger floor was tacked in already. Unfortunately when the parts were cut from the car they were not removed by cutting out the spot welds. So the flanges on the firewall and "A" post were cut off. And the strips of metal that were spot welded on are still need to be removed from where the sills attached.

The best part of the car is it has a clear title. So many cars I looked at didn't have a title. Buying a car without a title is actually illegal in Virginia. And I wanted to drive the car. A title was definitely needed.

The car was 5 hours from my house and so Saturday was spent collecting the car and the parts. By the time we got home it was late. Unloaded the car into the garage but left all the parts in the SUV until later.

4/1 Spent time unloading the parts from my SUV. But basically just dumped them down for now. But we look over the car good. Notice a ton more things wrong that we didn't see before. But kind of expected that'd happen.

The car has the "complete drive train". Wanting to know if the engine is a boat anchor or not I try to turn it by hand. Nothing doing. I put a wrench to the water pump and it just slips in the belt. I look in the oil fill hole and see rust. Yikes. Have to look at that more later.


The car has brand new tires on it. Well brand new as in meaning it's never driven on them. The owner I got the car from had the car 3 years and he didn't put them on. So no idea how old they really are. I'm guessing they are pretty old. The right front leaks air badly. It was full when we started our drive back home and by the time we got home it was pretty much flat. Wondered if it was a crack in the rim as it doesn't make much sense that there would be a puncture as it's not driven on them :-). Anyway.

Wanting to do something to make the car better. Anything really we tackled the flat tire first. See if it could be patched easily. And it'd make rolling the car around nicer. I air up the tire again and hit it with soapy solution. The air is coming from the bead. On further inspection there is a pretty good layer of dirt between the rim and the tire. I clean it out and check again. No more leak....from the outside edge. The inside side is leaking. Need to pull the tire off to really work on that one. no problem... Or is it.


I put a wrench to the lugs. No go. They are not moving. Ok grab the air wrench. It moves them but it's working hard. I move them just a little and put some penetrating oil on. They still are coming off hard. I wonder if it is just twisting off the stud. I move each a few degrees and move to the next. It starts to get easier after they move out 1/4 inch. I use the air wrench to finish pulling one and it comes out smoking. Whoa. The aluminum has corroded and wedged the nut tight in the bore. Stud's just fine. I put aside the smoking lug nuts and move on with the tire.


Cleaned the inner side like I did the outer side (pry the tire down with some tools and wipe out the dirt and flush with soapy water (it's what I had checking for leaks). Air it up and no more leaks!! Nice. A little clean up of the corrosion in the lug nut bores on the wheel and it's ready to go back on.


Before putting the tire on I wire brush the lugs and the mating surface a little. hey isn't there supposed to be a cap covering the wheel bearings? Wonder how long that's been off. After putting on the wheel I rock it. yah those bearings were probably bad before this car stopped driving. But first improvement project is done. The tire remains pumped up now. Making the car look just a little less sad :-)


4/2 We unbox the parts we got with the car to see what we have. We can tell we are missing a bunch. Hey were'd that radius arm bracket go? I remember holding it in my hand when loading up. I don't remember where it is packed. I check my SUV 4 times to ensure it didn't get under a seat or something. No go. Not in the garage. Humm. Did I just image I had it and thought it was really something else. I check photos of the parts pile from the ad. Yup it was there. I didn't image having seen it. But it's not here. I write the seller to see if I had left it behind. Nope nothing was left behind. I'm baffled as to where it went. Did I leave it on the trailer and it bounced off? who knows but it's gone. Another thing I need to source. Ugh.


Really curious how bad the motor is. If it is we'll probably swap something more modern in. Better pull the valve cover and see what is going on. Right around the fill hole there is terrible rust. Piles of rust dust. At the far end it doesn't look to bad. weird. The fill cap has a badly cracked seal on it. Perhaps that has something to do with it.


I pull the rocker assembly off as it's a disaster and will need to be refurbished if the engine is ever going to work. We vaccume up the rust dust off the head. Some has no doubt went down the lifter passageways.


I also pull the plugs and spray some oil into the bores. try to turn the motor over again by putting a wrench on the end of the alternator. Whoo hoo. The crank turns with the belt and it turns pretty easily. I check with a long screw driver that each piston is going up and down. Maybe the engine has a chance.


Looking over the rocker assembly 3 of the rockers are completely stuck. I put penetrating oil on them and put it asside. I also pull the push rods from the engine. The few closes to the oil fill hole come up with a nice cake of rust dust and oil. Engine needs a good clean. If that stuff were to get into the oil passage ways I'd expect bearing failure for sure.


4/3 No work on the car. Went to harbor freight and bought a few things I needed. most important a punch tool for all those spot welds.


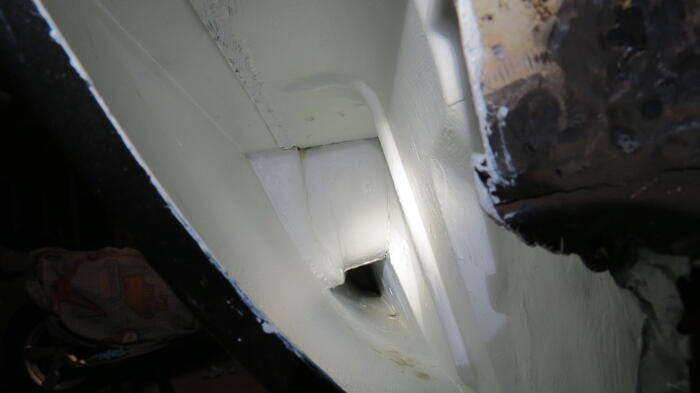
4/4 I had scheduled a day off to work on the car. Finally able to spend some decent time with it. I start by drilling out the remnants of the rocker panel from the "A" post and firewall. Then the remaining square of the lower "A" post. Starting to look a bit more like things should be. When I hold up the new lower "A" post panel it doesn't fit square at the door sill area where the transition piece also attaches. I test fit the rocker panel and it is short of the rear 1/4 panel. What gives.

I test fit a door and with it shoved to its full rear ward adjustment it still leaves a huge door to rear quarter gap. Humm. We measure the drivers side opening to the passenger side. The passenger side is about 3/8 of an inch bigger. We notice the "A" post looks a bit twisted in the door sill area. Measuring more the flange (where the door seals would go) look about right and the outer part where the bolts for the door are is where it is too open. I rig up a way to pull the outer part of the a-post rear while holding the inner inplace to square it up and get things back in shape. Pull the tacked in floor and call it a day.


Beading Floors And Misc

This past  week time was spent trying out a newly purchased beading tool. Being able to bead looked like fun and with so much of the rear fl...