It's usually really humid here and the small water trap on my air line was not getting out the water. Trev's blog, one place I go for metal working tips, showed how he made a drip leg that worked well for getting the water out.
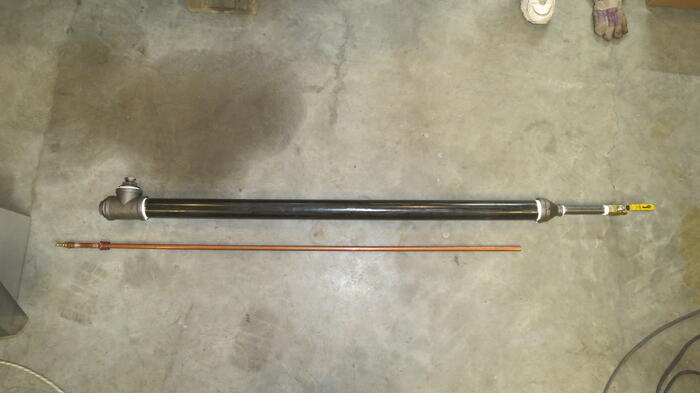
Thought I would do the same but instead of welding it together would make one out of threaded together parts. So I did. I think it turned out nice. Not shown in the pictures is I mounted it to my shelves in the garage and added a 10 ft section of 1/2 pipe to make the "cooling" section. The shelves are a bit of a mess so I didn't take a picture of that.
Saturday I did some sand blasting to try it out. It had just started raining. Ran through about 100 lbs of media and then checked the traps. Nothing in the little water trap at the end of the line. This is working great. Opened the valve at the bottom of the drip leg expecting a big rush of water. Nothing. Weird. Drained the compressors and there was a little but not much. So perhaps today wasn't a good test. I dunno. But It's setup now and in theory should work well. Will see how it works on future days. But Saturday the blasting went well.
Oh to make the trip leg I needed a fitting that would let a pipe go through but still seal on it. For this I used a 1/2" x 3/4" Copper x Male Adapter and drilled out the ridge that would keep the 1/2 pipe from going all the way through. Then I sweat soldered it on the pipe where I wanted it. That worked perfect.
For the main drip leg (not the added 1/2 pipe) the parts list is as follows:
1/2" x 3/4" Copper x Male Adapter
1/2" x 3/8" Copper x Female Adapter
1/2 copper pipe
3/4" x 3/8" Black Bushing
2" x 3/4" Black Bushing (2)
2" x 3/4" Black Reducing Coupling
3/4" x 6" Black Nipple
2" Black Tee
3/4" Full Port Threaded Ball Valve
2" x 48" Black Nipple
And of course some quick connect couplers
I couldn't find the 2" stuff locally (small town) so I bought most of it from www.supplyhouse.com Prices seemed good and they shipped quickly.
Oh in other news I work out my blasting tip. Time to change it for a new one.
(oh there was no post last week as I had company and didn't work on the car much)


No comments:
Post a Comment