Thursday, October 29, 2020

Top Of B-Pillar Repair

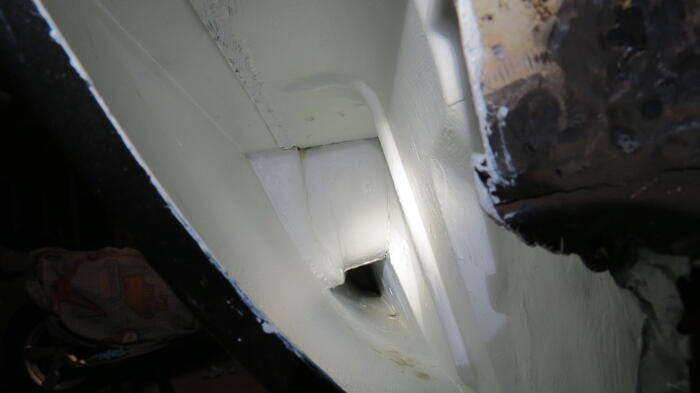
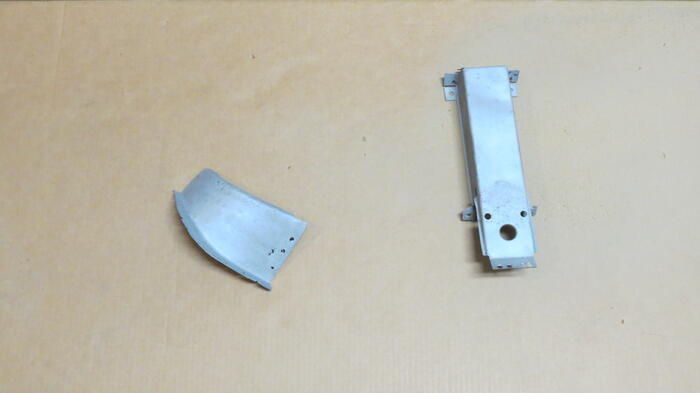
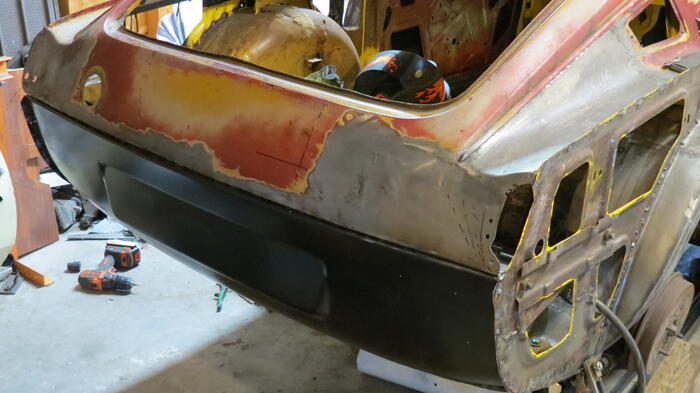
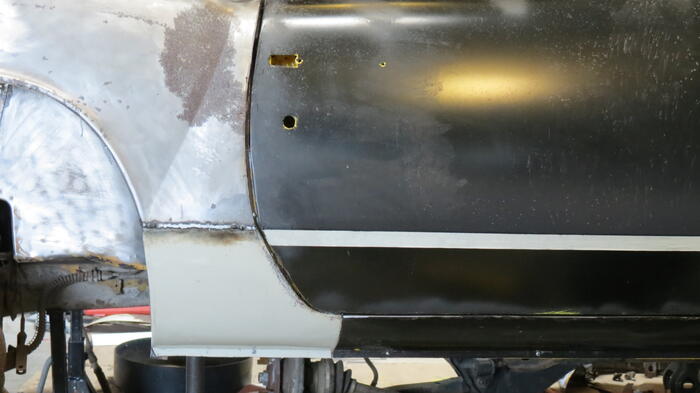
 As mentioned before there was rust where the B-pillar meets the side/quarter light window frame. There was also a small dent in the outside of that frame. So I cut out the plate that was rusted to about half way up the frame. It became obvious why it rusted. Where the quarter light window rivets to the frame water had came in through those holes. With no opening at the bottom (thanks triumph) the dampness rusted a big hole. But it also rusted the inside pretty good and there were some pinholes near the bottom as well. Bummer.


I cut the same part from the parts car but was not optimistic that it would be a lot better. It was better but it also had some thinning metal at the bottom. I was considering using it when I noticed a crease on the window frame side from when the roof was crushed pushing it against the glass. From the disassembly I was able to see there is NO primer of paint in there. Remarkable that it wasn't worse after 50 years.

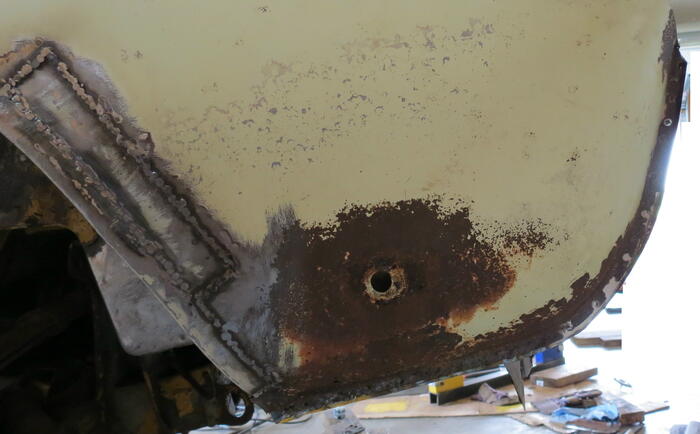
Back to my original piece i finished removing the backing plate. Quite a lot of rust but near the bottom was the only really bad stuff. Sorry no picture. Not sure where it went. Sand blasted the whole thing which showed some patching was required. Decided instead of cutting out chunks and welding in patches to put in a piece of backing material and weld through the thin spots to build them up. Figured it was faster and less likely to get everything out of sorts.

While the back was totally open I hammered out the small dent. Then noticed some other warping near the bottom on the quarter light side. Perhaps this contributed to the water getting in.

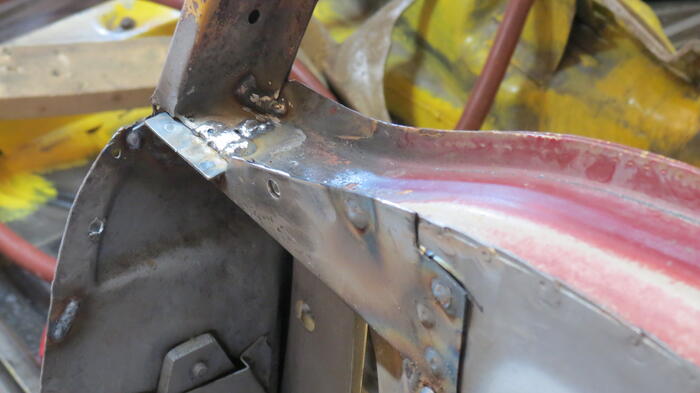
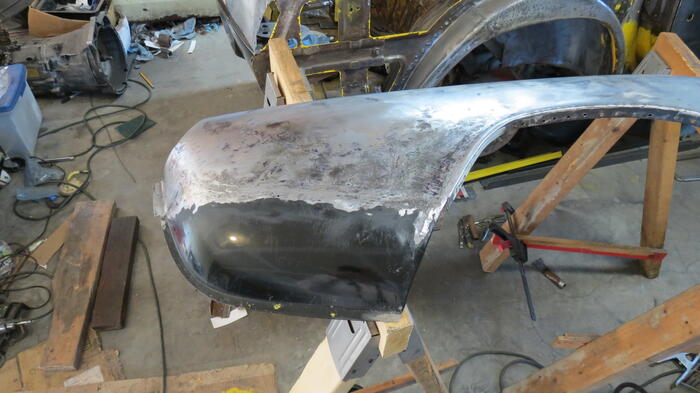
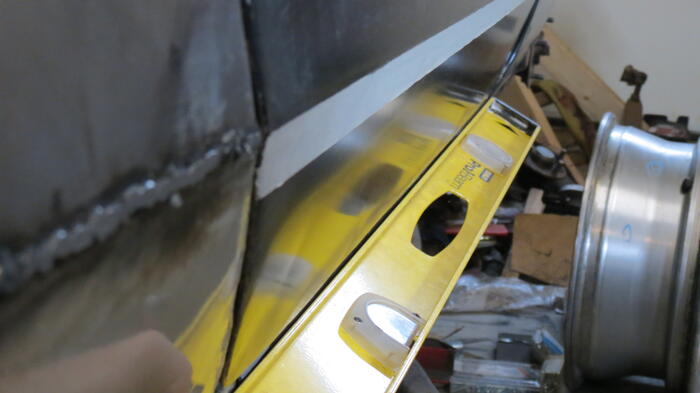
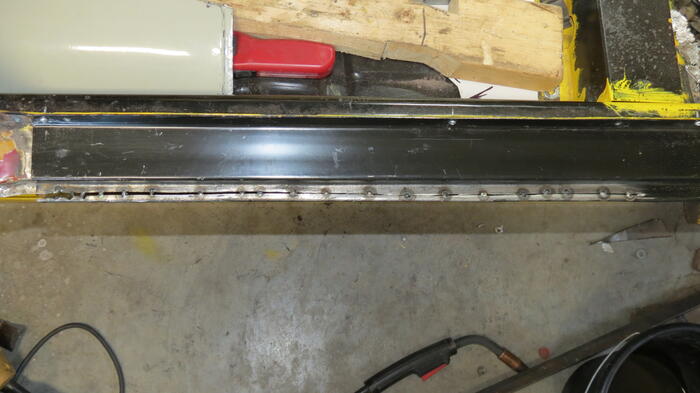
In making a new patch piece for the back I decided that instead of trying to form the crease down the center I would weld a stiffening rib on where would be the inside. This worked nicely even though the welding was a bit terrible. But it did warp the plate and I had to straighten it. After straightening I put it against the car only to see that on the side window edge the car isn't straight at all but curves as it goes down. With a little work I put that curve back in. Epoxy primed the inside the welded it on.


Sunday, October 25, 2020

Drip Leg/Water Separator

 It's usually really humid here and the small water trap on my air line was not getting out the water. Trev's blog, one place I go for metal working tips, showed how he made a drip leg that worked well for getting the water out.


Thought I would do the same but instead of welding it together would make one out of threaded together parts. So I did. I think it turned out nice. Not shown in the pictures is I mounted it to my shelves in the garage and added a 10 ft section of 1/2 pipe to make the "cooling" section. The shelves are a bit of a mess so I didn't take a picture of that.

Saturday I did some sand blasting to try it out. It had just started raining. Ran through about 100 lbs of media and then checked the traps. Nothing in the little water trap at the end of the line. This is working great. Opened the valve at the bottom of the drip leg expecting a big rush of water. Nothing. Weird. Drained the compressors and there was a little but not much. So perhaps today wasn't a good test. I dunno. But It's setup now and in theory should work well. Will see how it works on future days. But Saturday the blasting went well.

Oh to make the trip leg I needed a fitting that would let a pipe go through but still seal on it. For this I used a 1/2" x 3/4" Copper x Male Adapter and drilled out the ridge that would keep the 1/2 pipe from going all the way through. Then I sweat soldered it on the pipe where I wanted it. That worked perfect.

For the main drip leg (not the added 1/2 pipe) the parts list is as follows:
1/2" x 3/4" Copper x Male Adapter
1/2" x 3/8" Copper x Female Adapter
1/2 copper pipe
3/4" x 3/8" Black Bushing
2" x 3/4" Black Bushing (2)
2" x 3/4" Black Reducing Coupling
3/4" x 6" Black Nipple
2" Black Tee
3/4" Full Port Threaded Ball Valve
2" x 48" Black Nipple
And of course some quick connect couplers

I couldn't find the 2" stuff locally (small town) so I bought most of it from www.supplyhouse.com Prices seemed good and they shipped quickly.

Oh in other news I work out my blasting tip. Time to change it for a new one.

(oh there was no post last week as I had company and didn't work on the car much)


Friday, October 16, 2020

LH Side Welded

 After about 50+ man hours of work and 3 weeks the car looks......Well about the same. But instead of screws holding it together it is welded solid. Starting to feel like a car again instead of an art project.


It feels a bit weird to have to ask myself "what do I work on next". Been on the same part of the car for sooo long.


Sunday, October 11, 2020

RH Side Welded

 Well the RH Rear fender and rocker are welded on to the car. Spent a few evenings doing one last hammer and dolly on the patches and punching the holes. Then welded it on. All except the end cap which I'm keeping open so I can paint and maybe even seam seal later.


Sadly the car looks about the same as it did when everything is screwed together. But it is much more solid now. I've had a strap holding the lower A pillar in position for so long (without the rocker the lower A pillar is mostly just one thickness of sheet metal). It was nice to finally remove it.

It all turned out pretty good except the vertical gap between the door and rocker panel. Despite it looking good when screwed together after welding I noticed it's not as consistent as it was. It's a bit tighter a little bast the middle of the door and then back to good. Humm. I'll try the shrinking disc on it later. Perhaps it can shrink the metal back so it is better. But that can be a future project.

The one white tunnel picture is the inside of the rocker panel showing that the bottom edge has been painted (will do the top when I flip the body over). The brown spots are blasting media that must have slipped through the upper seem. Guessing from the inner sill to stiffener. That blasting media gets everywhere.


Saturday, October 10, 2020

Rocker Transition And Painting

 Before welding on the Rockers it looked like a good idea to weld on the transition piece. That way I could paint the inside and ensure it would be coated well. Then it would just have a weld seam against the A pillar similar to the rest of the rocker panel. I did not weld on the end cap. This was likely welded to the rocker before assembly to the car at the factory. I will leave it open so I can paint, or at least attempt to paint, the weld seams on the inside of the rocker. I picture moisture pooling up there and don't want any bare metal.


After that we primed the parts of the car that would be inside the Rockers and fenders. For projects where they don't remove these I don't see a lot of talk of how they get the paint in there. Or when they made the car originally. Perhaps that is a reason why they rusted so quickly? Who knows. I know I want it all painted/sealed.

The weld flanges were all taped off and the surfaces primed (still taped off in the pictures). This time we are using a white primer.


Wednesday, October 7, 2020

B-pillar Where It Meets The Quarter Window

 One of the oddities of this car is it was designed as a convertible and then the hardtop added later with changing as few parts as possible. This creates a few strange design and manufacturing choices. Where the side/quarter window part of the B-pillar has been added is one of them.


Where the side/quarter window post is welded onto the car body it has no passage into the lower part of the B-pillar. The red line in the attached picture. If one drills the rivets out to remove the quarter window frame the ends inside just fall down and are trapped and can't get out. Not a huge deal but what about moisture or dirt? And how did any primer of paint ever get in there? Also found that the forward edge of that horizontal metal is not even welded to the lock plate ("A" in the attached picture). Touches it but isn't joined. I could grab the edge and bend it back exposing the cavity in the upper B-pillar and let the rivet bits out.


Another part is shown as "B" in the attached picture. Best I can tell it looks like the spitfire part interfered with the GT6 adaption so the factory just bashed it out of the way leaving the flange hanging in space inside the rear quarter. (I have parts cars from other years and they are the same)

On the RH side of the car there was a rust through this part of the "B" pillar. Not sure if this mad design is the cause but it sure didn't help. Wanting to blast the rust out I cut away both pieces of metal that were just hanging in space and not welded to anything. Then media blasted it. Not sure how much I could get up into the side/quarter window post but it at least got the area's below it cleaned. From there I decided to cut the middle B-post down lower and fabricate a web similar to what was there but lower. But I made it extend all the way to the lock plate (which I welded) and have a opening directly below the side/quarter post channel to let out whatever might get in there. This seemed to stiffen it up and still gave plenty of air space to keep things from getting damp. And probably enough room for me to get some paint on it from the inside.

Oh one more change. Since I will not be brazing the fender on I choose to weld the side/quarter window post solid at the bottom. And also instead of using the vertical flanges turned to the inside of the car, I cut those off and added a horizontal tab. This way the fender joint there will be backed by some metal and I can hopefully weld a nice joint there without burning through. Will see how that turns out.

Well a lot of information that is uninteresting to most people. But I'll post incase there is someone in the future interested in such things.


Tuesday, October 6, 2020

Sand Blasting - Tricks And Headaches

 This week spent time trying to sand blast the inside of the rear fenders and the wheel arches that will be covered by the fenders. We were having better luck with sandblasting this time but it is still slow work (with my equipment anyway). The sand blaster needs more CFM than my compressor can supply. I looked to see what I might be able to buy that would have more CFM. Seems CFM isn't high on compressor buyers list I guess. As there were compressors with 3 times the tank size that gave FEWER CFM than my compressor with a 10 gal tank. And I don't want a big tank I want more CFM. The thought of using 2 (or more) medium compressors together isn't new. I looked on line and several people had done it. Went to buy another compressor like mine and the store was out. So had to order it. Went to buy some more aggregate and the store was out. Why do I go to stores?


Since I struck out at the stores I connected my small compressor, which has surprisingly good CFM for it's size and my medium compressor together. Screened my previously used media and went to town on the car.

I had read that keeping the moisture out of the lines is critical for sandblasting (and painting). I installed a water trap and when giving the compressors a break I'd refill the blaster. And I'd disconnect the air line to it and it would drain the trap. Well things were going well and so I had been pushing the compressors more and had found I could fill the blaster nearly to the top and not have to stop as much. Getting ready to blast another section I open the valve on the hose and...water comes out. What the? That can't be good. Turns out the water trap had filled and water, lots of water, had made it into the blaster. Whoa. Never expected that much water. It is really humid here. So I empty the blaster and quit for the night. Putting the media out into the sun the next day to dry it all out.

The next night of blasting went really well. Was able to run through a whole tank of media without issues. I'm having to reuse the media over and over and over because the stores here are all out. Maybe someone else is blasting too :-) All works well and things go a little faster with the more pressure with 2 compressors and I'm pretty satisfied. Other than stuff getting all over everything, despite trying to capture it.

Monday I decided I'd blast the paint of the inside of the rocker panels. The shape made it hard to use a wire wheel. I set up a blasting area just outside the garage. The new compressor had arrived and I'm thinking this is going to work out great. Sadly it was back to getting clogged frequently which was very annoying and slowed progress. This was similar to my first time blasting a long time ago. This morning it hits me that my blasting area was slightly downhill from the compressors and so was the first time. The times it all went well everything was mostly level but slightly uphill to the blasting area. Wonder if that is having an effect on either the moisture or aggregate flow. Next time I try blasting I'll be uphill and I'll have new aggregate. The store just got some in :-)


Sunday, September 27, 2020

RH Front Rocker Adjustment, Rust Pile, Sandblasting


For this week I adjusted the front door to rocker gap by cutting a slit in the rocker and pushing it in about 1/8 of an inch. It sits pretty flush with the door now and I'm satisfied. The corner of the door skin needs a little of adjustment but I'll do that a day when i have the door off.


Decided it's time to try sandblasting again. My first attempt worked but it went through the media way faster than I had expected. Reclaiming and reusing the media was needed. With that in mind I started cleaning up the disaster the car project created of the garage. In doing so I laid out a bunch of replaced parts and took a picture. It's not all the pieces that have been replaced as the RH floor and sills were gone already when i bought the car. But most of the major rust has been replaced except the hatch floor and inner fender wells.....and a bit on the drivers door......and the upper corners of the dash support......and the windshield frame...and the hatch frame. Ok so I have a lot more to do. But it feels like it's most of it by volume anyway.

Sand blasting this time I made a cardboard area to capture most of the media so I could reuse it. I also sifted/screened the media before use (even the new stuff) to remove larger chunks that would clog the blaster nozzle. Oh I forgot I previously had been using fine media (coal slag).
It worked but was slow work as it would only clear a small path. Thought I would try a bag of medium. The medium was much coarser and my machine wasn't able to use it. It just clogged up all the time. Wasn't even able to use the bag up. I dumped it out and put the fine back in. And was able to get that to work pretty well. But it is slow work and goes through the media relatively fast. I like the end results though.

Also did a bunch of small tweaks to the fender to improve it's contour and remove some of the waves in it. If I can get the fenders and where the fender mounts sandblasted it'll be prime and weld on time. Really looking forward to that.


Sunday, September 20, 2020

Home Made LH B Pillar Fender Patch


This week I made and installed the b-pillar fender patch for the LH side. For the RH side I had purchased one but it required so much work with the shrinker stretcher to get the profile right that I didn't think I'd loose much by making my own. So I did. Think it turned out pretty well, Also welded the patch in.


Other things completed was fitting the LH rocker panel to the car. It fits much better at the front of the door than the RH side. Did a quick profile comparison and no they are not the same. Ugh. Where is that guy that posts that he never has had any fitment problems with replacement panels? But was happy at least one side is good. As far as inboard outboard the LH as a bit of a bulge in it. Not sure if I'll cut and weld it or no. The door is original and had a few bumps and is not straight anymore. Might be just as easy to form the door to the Rocker contour.

Also welded in the rear valence brackets that are on the Right and left edges where it welds to the top. And also welded in the RH tail light mount plate. In the next week or so I'd like to move to prepping for painting the inside parts of the fenders, rockers and structure and welding them on. Everything takes longer than expect so who knows how far I'll get.

Sunday, September 13, 2020

Rear Valence Welded On

 Since I last wrote I did a bit of work to the LH fender. This fiddly stuff is very taxing on my patience at times and feels like the project will take forever. Made the decision to weld on the rear valence. Would be a step forward and feel like I was completing something. So that's what I did and I was right. Feels much better having that step out of the way. Though the car looks about the same as when the valence was screwed into place. It is much more solid. I welded the plug welds from the underside of the car so the rear looks nice and doesn't need grinding.


Of course after 2 welds I ran out of welding wire. Went to the store to buy another 2 lb spool and realized I should just buy a 10 lb spool. Then found the hole in the center of the 10 lb spool is bigger and I don't have an adapter. So fabricated an adapter and am good on welding wire for awhile.

Also picked up a NOS RF fender. Spent enough time on the rear fenders that I was happy to not have to do that on the front fender. Oh it will look so nice on the car.


Sunday, September 6, 2020

$3 Shrinking Disc

Finally tried my hand at a shrinking disc. Seems the going rate was $30-$60 for bought ones or many just make their own. Thought I'd try to make one. Used a piece from a chicken feeder I bought at the farm supply store for something like $3 and change. Drilled a hole in the middle for the angle grinder and voila.


Had a hard time believing it would work very well. But wow. The shrinking disc is almost like magic. Some of the warps in the metal from the heat from welding came right out easily. Getting the area around the welds flat and smooth was a bit more challenging. Especially on lap joints. I had heard they were stronger but they failed to mention using the hammer and dolly go get the joint flat afterwards is way harder :-)

Anyway spent some good time on the RH rear fender. I had seen a video where the guy used a marker to cover the area then lightly sand it to show the high and low spots. That worked pretty well though a wider marker would be good. While not perfect it is much improved. I'll put it aside for now and work on something else.


Sunday, August 30, 2020

Back At It. RH Rocker panel and new Wheels


This Saturday I was feeling well enough to try working in the garage. Welded up the cut I made in the rocker panel and welded the fender lower B pillar patch. But before that I made a trip to a salvage yard and picked up some rims. I think they look nice.


Still need to do some sanding on the fender patch but I think I have all the holes welded. The rocker welding and sanding back turned out really nice. I need to use a block sander on the inboard flat edge just to get it perfect. Then that seem will be invisible. Well other than it is nice and straight. Not sure how it was from the factory but the replacement parts seem to have not correctly adjusted the dies for the spring back.

There is still a bit of a miss match at the front lower edge of the door. I haven't decided what adjustment to make there. Many will say shim the door out. But the door inner edge to the sill where the weather seal will be needs to stay at a fixed distance. For a convertible may not be a big concern but I am trying to make it so the door will seal correctly. So that leaves bend the door skin out or cut slits in the rocker and adjust it. Will look into it more later.


Sunday, August 16, 2020

RH B-pillar Fender Patch Fitting

Sadly not much happened on the GT6 this week. I had done a little on earlier in the week but then Thursday I took a vacation day and was planning to pickup some parts for the the later customizing of it. But I hurt my back before the day got going (partly from too many years setting at a desk) and that ended that. Waiting for that to get better before I can work on things again. But before all that I started getting the B-pillar patch ready to weld to the fender.


In the pictures you can see I've done a bit of hammering and reshaping of the patch to fit the door and the contour of the car better. Also did a bit of this on the fender as well. I think the door gap is starting to look pretty good about right. Also cut the top of the fender patch and the fender on the seem. Seemed like a good idea (punny). The fit there is about ready to weld. The edge on the wheel arch isn't perfectly flush and needs a bit more work to fit nicely.


Sunday, August 9, 2020

Straighten RH Rocker

 This week I took the paint off the RH fender. Looks like it has been repainted at one time. Had really thick primer and some lead on a shallow dent (very surprised it was lead not bondo. Maybe it was done looong ago). Removed the paint and lead so I could do a little "dent flipping" on the dings before doing much fitting.


Saturday spend the day fitting the RH Fender patch for the lower part on the B pillar and rocker. I found The lower door edge is straight (at least on my car) but the rocker was a bit bowed out in the middle, outboard vs inboard. And at the rear part it was inboard about an 1/8" too much. I've seen some other car pictures and that rear corner of the door to rocker gap looked similar. So not sure what all is going on there. But I decided I couldn't leave it be. I had to try and improve on it (deviating from original again?). I had planned to fix just the back edge but one thing leads to another and I had cut a slit through 75% of the rocker and adjusted the fit. Turned out great I think. Very hard to show in pictures. But I can hold a straight edge up to the outside edge and it follows along nicely. Didn't get a picture with the B-pillar patch in but maybe I'll add that later.


Sunday, August 2, 2020

More Fender Patches

I'm really not building a car but a patch work quilt out of metal in the shape of a car. Or so it feels :-). This week I welded in the patch below the tail light on the RH fender. And patched the lower rear part of the LH fender. And a bit more work on the upper valence. And work on tail light mounting.


The patch on the LH fender was interesting. The original fender was still intact but had rusted thin with some small holes at the bottom and the flanges. And the bumper bolt location was wrong for the MKII (fender was from an MKI). There wasn't much guessing to the shape of the original fender. But try as I might I couldn't seem to get the patch to exactly match the car without some adjusting. And even then it still isn't 100% flat along the joint. I'll try to do some more adjusting but it may be a bit of filler has to go there to make it smooth.

The upper valence patch work I did this week turned out better than expected. The flange where the upper and lower valence weld together had rusted near the LH tail light. Maybe 3" of it was gone. But the outer surface was still perfect. Well almost perfect. I hated to cut it as it looked so nice. So I welded in only a new flange. I started by welding a fillet weld from the inside. Then finishing by welding from the lower outside. Then sanding the outside welds flat and smooth. Turned out pretty well. Except I need to do a little more sanding to get it a bit straighter. But over all it is a success and was much quicker than making or buying a patch.

One fairly simple but fun thing to have done. One of the bolts broke when removing the tail light on the fender. I tried drilling out and extracting it but it wasn't working. So I cut out the nut and welded in a new one. Using the tail light to ensure it was all aligning. On the RH side I had made a new plate but hadn't added the nuts. So did the same for it. Was funny to test fit the lights. Will be a while before they are needed but one less thing on my mind.


Beading Floors And Misc

This past  week time was spent trying out a newly purchased beading tool. Being able to bead looked like fun and with so much of the rear fl...